.png)
Time Machine from Back to the Future #77256 Review - Speed Champions set
- Fehlberg
- Jan 13
- 4 min read

A New Years eve visit to the LEGO store proved a worthwhile trip, as I was shown by a staff member the new DeLorean time machine. AU$39.99, the common LEGO store price for single Speed Champion vehicles at the moment, for 357 pcs of awesomeness!


I very much enjoyed this build, and I think it is the first Speed Champions set I have purchased new (I have picked up some second hand, but I think they are either prebuilt or still in their box… though I did build myself a Porsche with spare pieces using online instructions) as other than the Porsche ones, I haven’t really been attracted to the car sets much. But, like the Porsche, the Back to the Future car has a special nostalgic place in my heart, so I had to take it home with me.
There is a lot of SNOT techniques used (Studs Not On Top) which I loved, and I like that there were some stickers but that mostly printed pieces were provided.


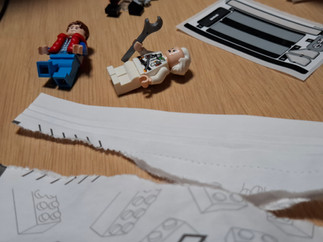
I also really liked the alternate endings for the construction, as you are able to build either the original car with its lightning hook, or the flying, fusion-powered version. You also get both Doc Brown and Marty McFly as the two included minifigures. The alternate build, and the extra minifigure than usual for Speed Champions, could have contributed to the piece count being higher than the average Speed Champions car, but I think it would still be above average anyway and therefore seems to be a good value Speed Champions set to buy for what is currently available. In comparison, I was also shown the new Lightning McQueen which has no minifigures and only 270 pcs… yes, it apparently is the first Speed Champions set to have a detailed undercarriage, and lots of stickers or printed pieces, but unless you are a fan of the Cars movies, then the value for money doesn’t seem to be there (mind you, Lightning McQueen is temporarily out of stock online at the moment, so it seems to be quite a popular one if that is the case).


I was glad when this #77256 Back to the Future vehicle was announced, as I wasn’t prepared to pay for the much more expensive #10300, and it also meant it was minifigure size and could be used as a play vehicle in a LEGO scene. The biggest downside of the downsizing is the lack of gull doors, the one disappointment in an otherwise great set, but the removable cockpit cover/windscreen makes inserting and removing the minifigures quite easy. The other point is the smaller set isn’t as much of a display item as the larger DeLorean, so if you are looking for something larger to display then check out set #10300, which has a 3 alternate finishes for the time machine as well.


The building process for this customised DeLorean is both fun and detailed, and the vehicle has so much detail included, such as the flux capacitor, time calculator, wires or pipes, vents, display panels or buttons, and more. The SNOT techniques utilised produce a fairly well-shaped DeLorean (other than the very front edges not quite flush with the sides, & the slightly sloped bonnet that is missing from this Speed Champion version), with a mostly stud-less finish, and nice angles along the sides too.
The trans-blue printed strip also looks nice, and it flows well considering the change in angles from the side to the top.
The dimensions of this #77256 vehicle according to the LEGO website are: over 10cm (4 in.) high, 17cm (6.5 in.) long, and 7cm (2.5 in.) wide. The height must be due to the long hook attached on the 1st movie’s version of the DeLorean, as I would say the main part of the vehicle is about 16cm long and 5.5cm high.


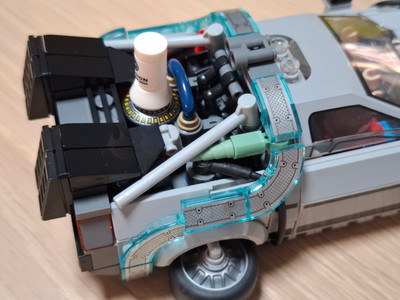
One thing to be aware of when applying the stickers, is the door panels, and having the black lines line-up with both a printed piece, and a separate sticker. I only realised this after I had added the stickers, and fortunately there was only a slight misalignment (noticeable on closer inspection) and no noticeable difference between each side of the car (I guess my determination to try and keep each side’s sticker as similar as possible meant that wasn’t so much a problem as the alignment with the next panel’s sticker alongside it). The other potentially tricky parts were the bendable/rubbery piece and the wheels/hubcaps. The long bendy piece wraps around under the car and back up again, it looks great, but you need to keep pressure on the piece as you pull it tightly into place and make sure it is secure so it doesn’t pop off causing you to start all over again. The wheels are easy to put together, but when you want to change to the alternate version, then you will need to use Doc’s spanner to push through the middle of the wheel to pop off the hubcaps and help remove the small grey piece used in the flying version (as there is not much to grab onto for pulling out with fingers). Also, something that confused me, yes it had fully paper bags for the parts, but I wasn't sure if the perforated paper marks were supposed to be a guide of where to tear, as none of my attempts to rip along those lines worked and would go astray... I guess it there is still slightly more control than the plastic bags.


It apparently has a ‘Build Together’ option for 2 builders using the LEGO Builder App, but I just used the paper instructions and my son help me put some of it together, so I cannot comment on that Builder App option… I downloaded the app on my phone to be able to comment on this option actually, but, although it sounds like a good idea, I needed another phone to download it onto and have a second person join me using a certain number (seemed like too much hassle when it was already built and the app was going to take up unnecessary space on another phone). The app also seemed to only have the duel building instructions for the flying version of the vehicle… something to keep in mind if attempting that building method.
In conclusion:
Love it, glad I bought it, fun building it, wish it had gull doors, but still straight onto my display shelf!


Looks like such a good build, but I am getting tired of stickers! On the plus side, at least this isn't a set that's going to break the bank. UCS sets on the other hand...
I agree about the Gull Doors, but that would have put the price into a couyple of tiers above where we all wanted it. I really enjoyed the build, but the stickers lining up with printed parts didn't make a lot of sense to me. Why not just add 2 more extra printed tiles? Ah well.